BigBlueButton Plugins
Welcome to the official documentation for BigBlueButton Plugins.
This guide covers a wide range of topics related to plugin development, including:
- How plugins work within the BigBlueButton system;
- How to build your first plugin (with a simple “Hello World” example);
- Detailed documentation on the various APIs available for interacting with meetings;
...and much more.
Let’s get started!
Usage
This is a general instruction on how to use a plugin. For a detailed configuration example of each use case, have a look at the READMEs in the respective samples-folders.
Running the Plugin from Source
For development purposes you can run a plugin locally from source.
For example if you take the sample-action-button-dropdown-plugin,
you do the following:
Running from source code with local BBB-server
-
Start the development server:
cd $HOME/src/bigbluebutton-html-plugin-sdk/samples/sample-action-button-dropdown-plugin
npm install
npm start -
Add reference to it on BigBlueButton's
/createcall or add it on/etc/bigbluebutton/bbb-web.properties:
pluginManifests=[{"url": "http://<your-URL>/manifest.json"}]
Reminder: Don't use the localhost URL that the npm start will create for you, Akka will not be able to access your manifest files this way (even if you are developing with a local bbb-docker environment). Therefore, what we recommend is to follow instructions on the next section to test the plugin as if it is in a remote BBB server (heads up: you'll be using NGROK).
Running from source code with a remote BBB-server
If you are running your BBB-server elsewhere, than you can't simply point the manifest URL to a local address, you'll need to either serve the built version into a CDN or serve the dev version using a service to make it public. And for the second option we'd recommend NGROK. Here are the instructions to do that:
-
Create an account on https://ngrok.com/ (Official website of NGROK);
-
Install NGROK in your computer. They have a guide for that right after you created your account;
-
Start the Plugin development server:
cd $HOME/src/plugin-pick-random-user-plugin
npm install
npm start
- Start the NGROK server into your machine with the following command:
ngrok http http://172.17.0.1:4701
Make sure to point NGROK to the correct local URL (In our case - The samples are made this way, for instance - we used http://172.17.0.1:4701)
Right after that, NGROK will create an interface into your terminal and will display the URL which your static files are being served.
Here's an example of URL: https://<uuid>.ngrok-free.app
You can already interact with this URL and access both
https://<uuid>.ngrok-free.app/manifest.json
or
https://<uuid>.ngrok-free.app/PickRandomUserPlugin.js
- Add this create parameter into the API-mate of the server you are testing it on:
pluginManifests=[{"url": "https://<uuid>.ngrok-free.app/manifest.json"}]
And there you go, you can test it freely.
Building the Plugin (Production)
To build a plugin for production use
(again, using the example of sample-action-button-dropdown-plugin),
follow these steps:
cd $HOME/src/bigbluebutton-html-plugin-sdk/samples/sample-action-button-dropdown-plugin
npm ci
npm run build-bundle
The above command will generate the dist folder, containing the bundled JavaScript file named SampleActionButtonDropdownPlugin.js along with the manifest.json.
These files can be hosted on any HTTPS server.
To use the plugin with BigBlueButton, add the plugin's manifest.json URL to bigbluebutton.properties or you can simply send it via /create parameter:
pluginManifests=[{"url":"<your-domain>/path/to/manifest.json"}]
Hosting the Plugin on a BBB Server
While the plugin can be hosted on any Server, it is also possible to host the bundled file directly on
a BigBlueButton server. For that you copy dist/SampleActionButtonDropdownPlugin.js and dist/manifest.json to the folder /var/www/bigbluebutton-default/assets/plugins/sampleActionButtonDropdownPlugin.
In this case, the your manifest URL will be https://<your-host>/plugins/sampleActionButtonDropdownPlugin/manifest.json.
Comments
Ways to load a plugin into a meeting
As described in earlier sections, there are several ways to load a plugin into a meeting:
/createparameterpluginManifests– Applies only to the meeting being created. You must explicitly list the plugins in the request./createparameterpluginManifestsFetchUrl– Also applies only to the meeting being created, but instead of listing plugins directly, you provide a URL that returns the plugin manifest list. This helps reduce the size of the/createrequest.pluginManifestsin/etc/bigbluebutton/bbb-web.properties– Applies globally to all meetings on the server.
All plugin sources are combined into a single list with duplicates removed. This means plugins are merged, not overridden.
Using Placeholders in Plugin URLs
You can use placeholders in the plugin URLs defined in any of the previously mentioned configurations. Currently, the only supported placeholder is:
%%HTML5_PLUGIN_SDK_VERSION%%– This will be automatically replaced by the version of thebigbluebutton-html-plugin-sdkused bybigbluebutton-html5.%%HTML5_PLUGIN_SDK_MAIN_VERSION%%– This will be automatically replaced by the Main version of thebigbluebutton-html-plugin-sdk- Composed by Major + Minor (e.g.:0.0for0.0.84) - used bybigbluebutton-html5.%%BBB_VERSION%%– This will be automatically replaced by the complete BigBlueButton server version (e.g.:3.0.6) from which the URL is called.%%BBB_MAIN_VERSION%%– This will be automatically replaced by the current BigBlueButton server Main version - Composed by Major + Minor (e.g.:3.0for3.0.6) from which the URL is called.%%MEETING_ID%%– This will be automatically replaced by the external meeting ID.
This is useful for referencing versioned plugin files without hardcoding the SDK version.
Examples:
pluginManifests=[{"url":"https://my-cdn.com/%%HTML5_PLUGIN_SDK_VERSION%%/pick-random-user/manifest.json"}]
Or
pluginManifestsFetchUrl=https://my-cdn.com/%%HTML5_PLUGIN_SDK_VERSION%%/all-my-plugins/list-of-plugins.json
If your bbb-html5 client uses version 0.0.79 of the bigbluebutton-html-plugin-sdk (as seen in its package.json):
{
  "dependencies": {
    "bigbluebutton-html-plugin-sdk": "0.0.79",
  },
}
Then BBB-Web will automatically transform the URLs as follows:
pluginManifests=[{"url":"https://my-cdn.com/0.0.79/pick-random-user/manifest.json"}]
Or
pluginManifestsFetchUrl=https://my-cdn.com/0.0.79/all-my-plugins/list-of-plugins.json
BBB-Web will then fetch the plugin manifests using these resolved URLs.
In the future, support for additional placeholders may be added.
Manifest Json
Here is a complete manifest.json example with all possible configurations:
{
  "requiredSdkVersion": "~0.0.77",
  "name": "MyPlugin",
  "version": "0.0.8", // Optional
  "javascriptEntrypointUrl": "MyPlugin.js",
  "javascriptEntrypointIntegrity": "sha384-Bwsz2rxm...", // Optional
  "localesBaseUrl": "https://cdn.domain.com/my-plugin/", // Optional
  "loggerSettings": {                                    // Optional
    "console": {
      "enableRuntimeErrorLogging": false,
      "enabled": true,
      "level": "debug" // Possible values: info, debug, warn, error
    },
    "external": {
      "enabled": false,
      "level": "info", // Possible values: info, debug, warn, error
      "url": "https://LOG_HOST/html5Log",
      "method": "POST",
      "throttleInterval": 400,
      "flushOnClose": true,
      "logTag": ""
    }
  },
  "dataChannels":[
    {
      "name": "public-channel",
      "pushPermission": ["moderator","presenter"], // "moderator","presenter", "all", "viewer"
      "replaceOrDeletePermission": ["moderator", "creator"] // "moderator", "presenter","all", "viewer", "creator"
    }
  ], // One can enable more data-channels to better organize client communication
  "eventPersistence": {
    "isEnabled": true // By default it is not enabled
  },
  "remoteDataSources": [
    {
      "name": "allUsers",
      "url": "${meta_pluginSettingsUserInformation}",
      "fetchMode": "onMeetingCreate", // Possible values: "onMeetingCreate", "onDemand"
      "permissions": ["moderator", "viewer"]
    }
  ],
  "serverCommandsPermission": {
    "chat.sendCustomPublicChatMessage": ["presenter", "moderator"] // "moderator","presenter", "all", "viewer"
  },
  "settingsSchema": [
    {
      "name": "myJson",
      "label": "myJson",
      "required": true,
      "defaultValue": {
        "abc": 123
      },
      "type": "json" // Possible values: "int", "float", "string", "boolean", "json"
    }
  ]
}
To better understand remote-data-sources, please, refer to this section
version:
This refers to the version of the plugin. It prevents browsers from caching old plugin files.
When set, it appends the version to javascriptEntrypointUrl, forcing browsers to fetch the latest file.
Example:
version=0.0.8
javascriptEntrypointUrl=MyPlugin.js
Browser will load: MyPlugin.js?version=0.0.8.
loggerSettings:
The optional loggerSettings directive allows you to override the default logger configuration for a specific plugin. For instance, you could set the client’s log level to info while restricting the plugin’s log level to error. If no settings are provided, the plugin’s logger inherits the default configuration.
settingsSchema:
The settingsSchema serves two main purposes:
- Validation: Ensures that all required settings are provided for a plugin. If any required setting is missing, the plugin will not load.
- Configuration Exposure: Lists all available settings for the plugin, enabling external systems—such as a Learning Management System (LMS)—to present these settings to a meeting organizer. This allows the organizer to configure the plugin manually before the meeting begins.
| Name | Required | Description |
|---|---|---|
name | Yes | The name of the setting as defined in the YAML file |
label | No | A user-facing label that appears in the integration UI |
required | Yes | Indicates whether this setting must be provided (true or false) |
defaultValue | No | The default value to use if no setting is explicitly defined |
type | Yes | The expected data type for the setting. Possible values: "int", "float", "string", "boolean", "json" |
Example
Given the settingsSchema defined in the manifest.json seen, the corresponding YAML configuration file (/etc/bigbluebutton/bbb-html5.yml) would look like:
public:
  plugins:
    - name: MyPlugin
      settings:
        myJson:
          abc: my123
          def: 3234
Examples
You can find example implementations demonstrating how to extend and customize various parts of the BigBlueButton client in the samples folder of the bigbluebutton-html-plugin-sdk repository.
Additionally, the BigBlueButton plugins repository provides a collection of official plugins that you can explore for inspiration.
Building a Hello-World Plugin Example
This section will guide you through all the steps needed to create a functional plugin—or at least a solid starting point. In this example, the plugin will add an option to the Options dropdown menu (the three dots in the top right-hand corner of the client). When clicked, it will trigger a popup displaying the message "hello world".
1. Choose the Right SDK Version
First, select the appropriate version of the bigbluebutton-html-plugin-sdk based on your BigBlueButton server. Refer to the section Plugin Versioning for guidance. You’ll need this information later in the tutorial.
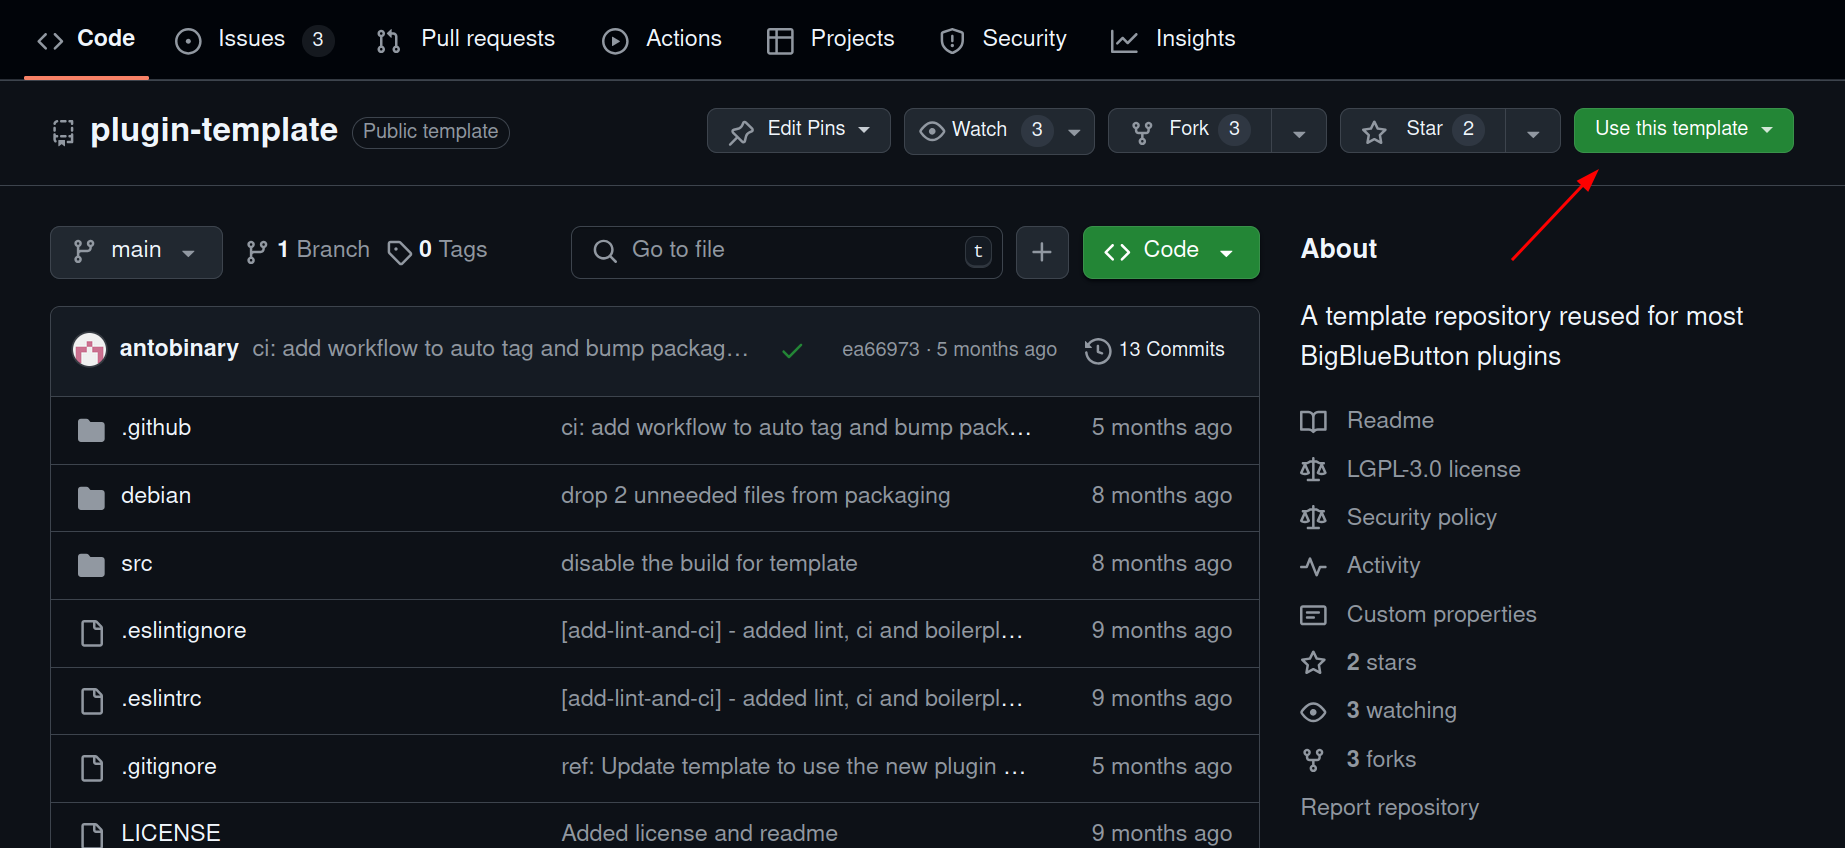
2. Use the Official Plugin Template
Start with the plugin template provided by the BigBlueButton organization, available at:
https://github.com/bigbluebutton/plugin-template
While it's possible to build a plugin from scratch, doing so requires specific configurations in files like package.json and webpack.config.js (if you're using Webpack), which can be tricky to get right. The official template saves time by providing all the necessary boilerplate so you can focus on writing your plugin logic.
To get started:
- Visit the template page and click the "Use this template" button to create your own repository under your GitHub account.
3. Clone the Repository and Start Coding
Clone your new repository locally and begin making the necessary modifications. Follow the sub-steps below:
Set Up the Plugin Name
- Name your plugin. For this tutorial, we’ll use
plugin-hello-world, but you’re free to choose another name. - Also define the PascalCase version of the name (e.g.,
PluginHelloWorld) for configuration files.
Update Placeholders
Replace all <plugin-name> placeholders in the following files:
package.jsonwebpack.config.js(use PascalCase)manifest.json(use PascalCase)
Check SDK Version Compatibility
Go to the bigbluebutton-html-plugin-sdk NPM page and check which version is compatible with your BigBlueButton server.
For example, if your server uses BigBlueButton 3.0, you might need the latest
0.0.xversion which is currently0.0.73.
Update your package.json accordingly and then run:
npm install
Create the Plugin Component
Create a folder and component file:
mkdir src/plugin-hello-world
touch src/plugin-hello-world/component.tsx
Now add the following code to component.tsx:
import { BbbPluginSdk, OptionsDropdownOption, pluginLogger } from 'bigbluebutton-html-plugin-sdk';
import * as React from 'react';
import { useEffect } from 'react';

interface PluginHelloWorldProps {
  pluginUuid: string;
}

function PluginHelloWorld({ pluginUuid }: PluginHelloWorldProps): React.ReactElement {
  BbbPluginSdk.initialize(pluginUuid);
  const pluginApi = BbbPluginSdk.getPluginApi(pluginUuid);

    useEffect(() => {
      pluginApi.setOptionsDropdownItems([
        new OptionsDropdownOption({
          label: 'Click me',
          icon: 'user',
          onClick: () => {
            alert('Hello, World!');
            pluginLogger.info('Option has been clicked');
          },
        }),
      ]);
    }, []);

  return null;
}

export default PluginHelloWorld;
- The
useEffecthook ensures the plugin initializes only once. setOptionsDropdownItemsadds the new button to the dropdown menu.- The
onClickhandler triggers a simple popup.
4. Update index.tsx
Paste the following code into your index.tsx file:
import * as React from 'react';
import * as ReactDOM from 'react-dom/client';
import PluginHelloWorld from './plugin-hello-world/component';

const uuid = document.currentScript?.getAttribute('uuid') || 'root';
const pluginName = document.currentScript?.getAttribute('pluginName') || 'plugin';

const root = ReactDOM.createRoot(document.getElementById(uuid));
root.render(
  <PluginHelloWorld
    pluginUuid={uuid}
    pluginName={pluginName}
  />
);
That’s It!
You’ve successfully created your first plugin!
To run the plugin, choose one of the following modes:
Feel free to reach out to us for additional information or help.
Plugin Architecture
This section explains how plugins work in BigBlueButton, from definition to loading and execution in the client.
What is a Plugin?
In BigBlueButton, a plugin is simply a JavaScript file that gets loaded in the user's browser.
A common question is:
Do end users (e.g.: students) need to install anything, like a browser extension?
The answer is: No! The JavaScript file (plugin) is delivered to the client automatically by the server. The bigbluebutton-html5 client loads it without requiring any action from the user.
How the plugin is loaded?
The plugin loading process is divided into two main phases: meeting creation and client loading.
- Meeting Creation Phase
During meeting creation:
- The client sends a request to the /create endpoint with a list of
pluginManifests. bbb-webfetches the plugin manifests from a static plugin server storage (e.g.: S3 or internally from BBB server).- Once fetched, it includes the manifest content in a CreateMeetingReqMsg, which is sent to Akka.
- Akka stores the plugin data in the database for that meeting.
One other way to send the pluginManifests list to bbb-web is to include it into /etc/bigbluebutton/bbb-web.properties as mentioned previously in the second point of this section. This way, bbb-web gets the it via config file and it will be applied to every meeting of this particular server (with no need to include it in every create call). Key point: if a different list is included in the create call along with the list in the properties file, they will be merged into one and carry on the flow.
As for the second part, when the user joins the meeting:
- The client issues a PluginConfigurationQuery through the GraphQL server.
- The server queries the database and returns the plugin configuration, which includes:
plugin {
  name,
  javascriptEntrypointUrl,
  javascriptEntrypointIntegrity,
  localesBaseUrl,
}
- Using this information, the client fetches the plugin’s JavaScript bundle from the plugin storage server and loads it into the React component tree.
Developing the bigbluebutton-html-plugin-sdk
This guide explains how to contribute to the bigbluebutton-html-plugin-sdk, including adding new features or fixing existing issues. It also covers how to integrate those changes with the BigBlueButton client when necessary.
1. Determine the Scope of the Change
Before starting development, assess whether your change affects only the plugin-sdk repository or also requires changes to the main BigBlueButton (bbb-html5) repository.
As an example, let's walk through a feature that affects both: adding a data-test attribute to the floating window extensible area.
2. Fork necessary repositories
After deciding the repositories in which the changes are needed, it is necessary to have a fork to contribute.
- Fork the bigbluebutton-html-plugin-sdk repository;
- Fork the main bigbluebutton repository;
- Clone the forks locally;
git clone https://github.com/YourUsername/bigbluebutton-html-plugin-sdk
3. Setting Up Your Environment
After having cloned both repositories cloned locally:
bigbluebutton-html-plugin-sdkbigbluebutton
Create a development branch in both repositories (ideally with the same name) to keep changes organized.
4. Make Changes in the Plugin SDK
Start by implementing the required changes in the SDK. In our example, we’ll add a new dataTest string property to the FloatingWindow component:
File: src/extensible-areas/floating-window/component.ts
export class FloatingWindow implements FloatingWindowInterface {
  id: string = '';
  type: FloatingWindowType;
  dataTest: string;

  constructor({
    id,
    dataTest,
    ...
  }: FloatingWindowProps) {
    if (id) this.id = id;
    this.dataTest = dataTest;
    ...
  }
}
Also update the type definition to reflect this new property:
File: src/extensible-areas/floating-window/types.ts
export interface FloatingWindowProps {
  id: string;
  dataTest: string;
  ...
}
5. Publish the changes to the projects needed
To verify your change, you’ll need to test it in a sample plugin and in the BigBlueButton client.
For new features, it’s best to create a new sample plugin. However, in this example, we'll use the existing sample-floating-window-plugin.
Follow these steps to build and publish the SDK to both the sample plugin and bbb-html5:
# From the SDK root
npm install
npm run build

# Ensure dependencies are installed in both target projects
cd ~/path/to/bigbluebutton-html5
npm install
cd -

cd samples/sample-floating-window-plugin
npm install
cd -

# Publish SDK changes to both the BBB client and the sample plugin
./scripts/publish-to-project-folder.sh ~/path/to/bbb-html5
./scripts/publish-to-project-folder.sh samples/sample-floating-window-plugin
This ensures the changes in the SDK are applied to both the BigBlueButton client and the plugin sample.
Optional: To publish the SDK to all sample plugins at once, use:
./scripts/publish-to-samples.sh
6. Update the BigBlueButton Client (bbb-html5)
Now make the necessary changes to the bigbluebutton/bigbluebutton repository in the bigbluebutton-html5 directory. For our example, update the following files to pass and use the new dataTest prop:
File: imports/ui/components/floating-window/component.tsx
const renderComponent = (
  elementRef: React.MutableRefObject<null>,
  ...
  dataTest: string,
) => (
  <Styled.FloatingWindowContent
    ref={elementRef}
    id={key}
    data-test={dataTest}
    ...
  />
);
Update the container (imports/ui/components/floating-window/container.tsx) logic to pass dataTest down to the renderComponent.
7. Update the Sample Plugin
After the SDK is built and published, you can update the sample plugin to use the new dataTest property accordingly. And test it (using the development mode, for example) against the BigBlueButton's client (bigbluebutton-html5).
8. Submitting Pull Requests
Once all changes are complete and tested:
- Commit the changes in the
bigbluebutton-html-plugin-sdk(all needed to run the feature/fix and the changes made to the sample); - In the
bigbluebutton-html5client do not reference a version number for the SDK inpackage.jsonyet. Instead, use the commit hash from your SDK changes
Example:
"dependencies": {
  ...
  "bigbluebutton-html-plugin-sdk": "https://codeload.github.com/bigbluebutton/bigbluebutton-html-plugin-sdk/tar.gz/<commit-hash-id>"
}
You can get the commit hash from git log or directly from the commit list in your bigbluebutton-html-plugin-sdk pull request.
Alternatively, it is possible to reference the PR from the bigbluebutton-html-plugin-sdk directly. (This implies that you need to first send the PR for this repository and then the PR for bigbluebutton/bigbluebutton)
The resulting package.json would be:
"dependencies": {
  ...
  "bigbluebutton-html-plugin-sdk": "https://codeload.github.com/bigbluebutton/bigbluebutton-html-plugin-sdk/tar.gz/refs/pull/<pr-number>/head"
}
Replace <pr-number> with your actual pull request number.
After adding it, run:
# From bigbluebutton-html5
npm install
This will update the bigbluebutton-html5/package-lock.json accordingly.
- Publish the branches to the origin by running
git push --set-upstream origin <branch-name>for both repositories; - Submit a separate pull request for each repository (
bigbluebutton-html-plugin-sdkandbigbluebutton).
9. Finalizing with an Official SDK Version
Once your PRs are approved:
- The maintainers will merge the SDK PR first.
- A new version will be published to npmjs.com (e.g.:
0.0.99). - You’ll then update the
package.jsoninbigbluebutton-html5to use the official version:
"dependencies": {
  ...
  "bigbluebutton-html-plugin-sdk": "0.0.99"
}
- Run:
npm install
- Finally, update the SDK version in the following file in the
bigbluebutton-webproject:
File: bigbluebutton-web/grails-app/conf/bigbluebutton.properties
html5PluginSdkVersion=0.0.99
- Now you stage these last changes, likely, those will be just:
bigbluebutton-web/grails-app/conf/bigbluebutton.properties
bigbluebutton-html5/package.json
bigbluebutton-html5/package-lock.json
- Commit the staged changes and push to origin to update the
bigbluebutton/bigbluebuttonPR.
With that, your feature or fix will be ready for release. 🎉
API
Extensible UI areas
Foreach of the following ui-extensible-area, we have a different setter function accessible via pluginApi.
Mind that, although each area has its own structure, all the functions follows a certain argument structure, and returns nothing, that would be:
pluginApi.setterFunctionExample([{
  objectProperty1: 'string',
  objectProperty2: 123,
}])
See, it is basically a function that requires an array as an argument, with which the more items you push to that array, the more of that extensible area you will have.
That being said, here are the extensible areas we have so far:
- Action bar items (button, separator)
- Action Button Dropdown Items (option, separator)
- Audio settings dropdown items (option, separator)
- Camera settings dropdown items (option, separator)
- Options settings dropdown items (option, separator)
- Nav bar items (button, info)
- Presentation dropdown items (option, separator)
- Presentation toolbar items (button, separator, spinner)
- User camera settings dropdown items (option, separator)
- User list dropdown items (option, separator)
- User list item additional information (item, label)
- Floating window item (floatingWindow)
- Generic Content (main, sidekick)
- User Camera Helper (button)
- Screenshare Helper (button)
Mind that no plugin will interfere into another's extensible area. So feel free to set whatever you need into a certain plugin with no worries.
Auxiliaries:
getSessionToken: returns the user session token located on the user's URL.getJoinUrl: returns the join url associated with the parameters passed as an argument. Since it fetches the BigBlueButton API, this getter method is asynchronous.useLocaleMessages: returns the messages to be used in internationalization functions (recommend to usereact-intl, as example, refer to official plugins)logger: the pluginLogger is part of the API and can be used as pictured ahead:
export const { logger: pluginLogger } = pluginApi;
// Or in the index file:
import { BbbPluginSdk } from 'bigbluebutton-html-plugin-sdk';

const uuid = document.currentScript?.getAttribute('uuid') || 'root';

export const { logger: pluginLogger } = BbbPluginSdk.getPluginApi(uuid);
Realtime data consumption
useCurrentPresentationhook: provides information regarding the current presentation;useLoadedUserListhook: provides information regarding the loaded user list (displayed in the screen);useCurrentUserhook: provides information regarding the current user;useUsersBasicInfohook: provides information regarding all users (only crucial information: userId, name and role);useLoadedChatMessageshook: provides information regarding the loaded chat messages;useCustomSubscriptionhook: with this hook, the developer can query pretty much anything graphql can provide. Note: Make sure that, on BBB version change, the custom subscriptions you make will work as expected.usePluginSettingshook: it provides all the specific settings regarding the current plugin it's been loaded from.useTalkingIndicatorhook: it gives you information on the user-voice data, that is, who is talking or muted.useMeetinghook: it gives you information on the current meeting that the user is on.
So for these types of hooks, the return will follow the same structure:
export interface GraphqlResponseWrapper<TData> {
  loading: boolean;
  data?: TData;
  error?: ApolloError;
}
So we have the data, which is different for each hook, that's why it's a generic, the error, that will be set if, and only if, there is an error, otherwise it is undefined, and loading, which tells the developer if the query is still loading (being fetched) or not.
Realtime Data Creation
useCustomMutation Hook
The useCustomMutation hook enables you to post data to the backend (Postgres) using existing GraphQL mutations, respecting user permissions.
It works similarly to Apollo Client’s useMutation, returning a trigger function and a result object with information about the mutation execution. These will be described in more detail below.
One important difference is that the mutation query must be provided as a string. This is due to how the SDK communicates with the HTML5 client. As a consequence, you must explicitly define the type of the variables argument for the trigger function, as shown in the example below.
interface MutationVariablesType {
  reactionEmoji: string;
}

const [trigger, result] = pluginApi.useCustomMutation<MutationVariablesType>(`
  mutation SetReactionEmoji($reactionEmoji: String!) {
    userSetReactionEmoji(reactionEmoji: $reactionEmoji)
  }
`);

// Later in the code, you can trigger the mutation:
trigger({
  variables: {
    reactionEmoji: '👏',
  },
});
Note that the same type (MutationVariablesType) passed as the generic parameter to useCustomMutation is also the type of the variables object in the trigger function.
The result object returned by the hook contains the following fields:
const {
  called,
  data,
  error,
  loading,
} = result;
which follow this interface:
interface MutationResultObject {
  called: boolean;   // Indicates if the trigger function has been called
  data?: object;     // Response data after the mutation is triggered
  error?: object;    // Error details from the mutation execution
  loading: boolean;  // Whether the mutation is currently loading (triggered or in progress)
}
Now, see a diagram with the communication flow of this hook and how it works under the hood:
Following on the diagram with some details:
- At first, the SDK sends a
windowEvent(CREATE_NEW_CUSTOM_MUTATION) to the HTML5 client and start waiting for an update from the client; - At the same, it starts listening to the
MUTATION_READYevent; - Once the client receives a request to create a new mutation, it will add this mutation along with its options to a list of active mutations;
- With the list of active mutations in hand, it will call the handler of each mutation which will create the mutation itself for each of those in the list;
- When the mutation is created in the HTML5 client, it sends a
windowEvent(MUTATION_READY) to the plugin-sdk to let it knowing that it is ready to be triggered and starts listening for the triggering event; - Once the SDK receives the
readyevent, it creates the trigger function and make it available for the plugin; - Now, once the plugin triggers the function, a
windowEventis sent to the HTML5; - HTML5 simply receives it and execute it returning the resulting data for the plugin via
MUTATION_RESULT_SENTevent.
That's the current architecture of this feature
Real time data exchange
useDataChannelhook: this will allow you to exchange information (Send and receive) amongst different users through the same plugin;
So for this hook to read the data from the data channel, the developer will be able to choose the format in which they want it.The possible formats are described down below:
- ALL_ITEMS: Fetches all items from specific data-channel and specific subchannel-name since the beginning of the meeting from the newest to the latest (It can be used as a history);
- LATEST_ITEM: Fetches only the latest item pushed to the data-channel within a specific subchannel-name since the beginning of the meeting;
- NEW_ITEMS: Fetches the new items pushed to the data-channel within a specific subchannel-name since the moment that the
useDataChannelhook has been called (It will not see entries sent previous to that moment);
An interesting thing about this hook is that it is generic, so, you can use a custom type, and this will be found not only in the consumer part of the data structure returned, but also in functions in which you need to specify an object to be persisted, meaning it will force the object to be of the type you mentioned previously (that is the case for pushEntry and replaceEntry). One can find examples of usage of this in the data-channel plugin sample or most of the official ones. The syntax is described below:
const {
  data: response, // Data that will be returned
  pushEntry: pushEntryFunction, // Function to push another item to the data-channel
  deleteEntry: deleteEntryFunction, // Function to delete specific item or wipe all
  replaceEntry: replaceEntryFunction, // Function replace a specific item
} = useDataChannel<CustomType>(
  channelName, // Defined according to what is on manifest.json
  DataChannelTypes.ALL_ITEMS, // | LATEST_ITEM | NEW_ITEMS -> ALL_ITEMS is default
  subChannelName = 'default', // If no subchannelName is specified, it will be 'default'
);
Wiping all data off will delete every item from the specific data-channel within the specific subchannel-name.
Data-channel configuration:
The data-channel name must be in the manifest.json along with all the permissions for writing (pushPermission), updating and deleting (replaceOrDeletePermission), see example below:
{
  "requiredSdkVersion": "~0.0.59",
  "name": "PluginName",
  "javascriptEntrypointUrl": "PluginName.js",
  "dataChannels":[
    {
      "name": "channel-name",
      "pushPermission": ["moderator","presenter"],
      "replaceOrDeletePermission": ["moderator", "creator"]
    }
  ]
}
If no permission is mentioned in that file (writing or deleting), no one will be able proceed with that specific action:
The pushEntryFunction has a minor detail to pay attention to, it is possible to specify the users who you want to send the item to, if none is specified, all will receive the item, such as done ahead:
pushEntryFunction(objectToBePushed: T, options: {
  receivers?: ObjectTo[];
})
export interface ToUserId {
  userId: string;
}
export interface ToRole {
  role: DataChannelPushEntryFunctionUserRole;
}

export type ObjectTo = ToUserId | ToRole;
Real time ui data consumption
useUiDatahook: This will return certain data from the UI depending on the parameter the developer uses. It works just like the useUiEvent hook, but instead of passing a callback as a parameter to be run every time the event occurs, it will return the data directly, keep in mind that the second parameter is the default value that this function will assume. Possible choices:- IntlLocaleUiDataNames.CURRENT_LOCALE;
- ChatFormUiDataNames.CURRENT_CHAT_INPUT_TEXT;
- ChatFormUiDataNames.CHAT_INPUT_IS_FOCUSED;
- ExternalVideoVolumeUiDataNames.CURRENT_VOLUME_VALUE;
- ExternalVideoVolumeUiDataNames.IS_VOLUME_MUTED;
- UserListUiDataNames.USER_LIST_IS_OPEN;
- LayoutPresentationAreaUiDataNames.CURRENT_ELEMENT;
Example of usage:
  const currentLocale = pluginApi.useUiData(IntlLocaleUiDataNames.CURRENT_LOCALE, {
    locale: 'en',
    fallbackLocale: 'en',
  });
  // Do something with the currentLocale:
  currentLocale.locale;
  currentLocale.fallbackLocale;
Mind that foreach enum we have, a different type of fallback is needed as the second argument. In the example above, we want the intl, so the second argument, will follow the structure depicted.
One other thing is that the type of the return is precisely the same type required as the second argument.
Fetch ui data on demand
getUiDataasync function: This will return certain data from the UI depending on the parameter the developer uses. Unlike theuseUiDatathis function does not return real-time information as it changes. See the currently supported:- PresentationWhiteboardUiDataNames.CURRENT_PAGE_SNAPSHOT;
Example of usage:
  const { pngBase64 } = pluginApi.getUiData(
    PresentationWhiteboardUiDataNames.CURRENT_PAGE_SNAPSHOT,
  );
  // Do something with the currentLocale:
  console.log('This is an example fetching the base64 PNG', pngBase64);
As seen for the useUiData, the return type is well defined by the enum chosen (in other words, name of the ui-data). So I encourage you to take a look into the previous section to know more about it.
Ui Commands to automatize tasks in BBB
uiCommands object: It basically contains all the possible commands available to the developer to interact with the core BBB UI, see the ones implemented down below:
- actions-bar:
- setDisplayActionBar: this function decides whether to display the actions bar
- camera:
- setSelfViewDisableAllDevices: Sets the self-view camera disabled/enabled for all camera devices of a user;
- setSelfViewDisable: Sets the self-view camera disabled/enabled for specific camera.
- chat:
- form:
- open: this function will open the sidebar chat panel automatically. Optionally accepts
{chatId: string}to open a specific chat; - fill: this function will fill the form input field of the chat passed in the argument as
{text: string}
- open: this function will open the sidebar chat panel automatically. Optionally accepts
- form:
- conference:
- setSpeakerLevel: this function will set the speaker volume level(audio output) of the conference to a certain number between 0 and 1;
- external-video:
- volume:
- set: this function will set the external video volume to a certain number between 0 and 1 (that is 0% and);
- volume:
- layout:
- changeEnforcedLayout: (deprecated) Changes the enforced layout
- setEnforcedLayout: Sets the enforced layout
- navBar:
- setDisplayNavBar: Sets the displayNavBar to true (show it) or false (hide it).
- notification:
- send: This function will send a notification for the client to render, keep in mind that it's only client-side. Should you want it to be rendered in multiple clients, use this with a data-channel;
- presentation-area:
- open: this function will open the presentation area content automatically;
- close: this function will close the presentation area content automatically;
- sidekick-options-container: (deprecated - use sidekickArea instead)
- open: this function will open the sidekick options panel automatically;
- close: this function will close the sidekick options panel automatically (and also the sidebar content if open, to avoid inconsistencies in ui);
- sidekickArea:
- options:
- panel:
- open: this function will open the sidekick container automatically;
- close: this function will close the sidekick container (and sidebar content panel) automatically;
- renameGenericContentMenu: this function renames the menu name (option's name) of a Generic Sidekick Content. Takes
id(string) andnewName(string) as parameters; - renameGenericContentSection: this function renames the section name (section that the option belongs to) of a Generic Sidekick Content. Takes
id(string) andnewName(string) as parameters; - setMenuBadge: this function sets a badge on the sidekick option menu. Takes
id(string) andbadgeContent(string) as parameters; - removeMenuBadge: this function removes the badge from the sidekick option menu. Takes
id(string) as parameter;
- panel:
- options:
- user-status:
- setAwayStatus: this function will set the away status of the user to a certain status;
See usage ahead:
  pluginApi.uiCommands.chat.form.open();
  pluginApi.uiCommands.chat.form.fill({
    text: 'Just an example message filled by the plugin',
  });
So the idea is that we have a uiCommands object and at a point, there will be the command to do the intended action, such as open the chat form and/or fill it, as demonstrated above
SidekickArea UI Commands
The sidekickArea commands allow plugins to control and customize the sidekick panel and its content options. These commands are particularly useful when working with Generic Sidekick Content.
Panel Controls:
// Open the sidekick container
pluginApi.uiCommands.sidekickArea.options.panel.open();

// Close the sidekick container
pluginApi.uiCommands.sidekickArea.options.panel.close();
Badge Management:
Badges are visual indicators that can be displayed on sidekick menu options to show notifications or counts.
// Set a badge on a sidekick menu option
pluginApi.uiCommands.sidekickArea.options.setMenuBadge(
  'my-sidekick-content-id',
  '5'  // Badge content (e.g., notification count)
);

// Remove a badge from a sidekick menu option
pluginApi.uiCommands.sidekickArea.options.removeMenuBadge('my-sidekick-content-id');
Renaming Content:
// Rename the menu option name
pluginApi.uiCommands.sidekickArea.options.renameGenericContentMenu(
  'my-sidekick-content-id',
  'New Menu Name'
);

// Rename the section that contains the menu option
pluginApi.uiCommands.sidekickArea.options.renameGenericContentSection(
  'my-sidekick-content-id',
  'New Section Name'
);
For a complete working example, see the sample-generic-content-sidekick-plugin in the SDK repository.
Server Commands
serverCommands object: It contains all the possible commands available to the developer to interact with the BBB core server, see the ones implemented down below:
-
chat:
- sendChatMessage: This function sends a message to a specific chat by chatId on behalf of the currently logged-in user
- sendPublicChatMessage: This function sends a message to the public chat on behalf of the currently logged-in user
- sendCustomPublicMessage: This function sends a text message to the public chat, optionally including custom metadata
Note: The custom messages sent by plugins are not automatically rendered by the client. To display these messages, a plugin must handle the rendering using
useLoadedChatMessagesanduseChatMessageDomElements. - createPrivateChat: This function creates a private chat with a specific user
-
caption:
- save: this function saves the given text, locale and caption type
- addLocale: this function sends a locale to be added to the available options
As these commands can change state in the back-end, "permission control" is available based on role for some of the Commands (in the manifest), those are:
- chat:
- sendCustomPublicMessage;
An example of the usage is displayed in the Manifest section, but in general the idea is to have a similar hierarchy as the server-commands from the SDK, see example ahead:
"serverCommandsPermission": {
  "chat.sendCustomPublicChatMessage": ["presenter"] // Could have all the other roles, see manifest section
}
If no permission is present in the manifest, then we consider that every user in the meeting can use the server-command.
Dom Element Manipulation
useChatMessageDomElementshook: This hook will return the dom element of a chat message reactively, so one can modify whatever is inside, such as text, css, js, etc.;useUserCameraDomElementshook: This hook will return the dom element of each of the user's webcam corresponding to the streamIds passed reactively, so one can modify whatever is inside, such as text, css, js, etc., and also can get the video element within it;
Learning Analytics Dashboard integration
This integration allow you to insert/update entry in LAD (Learning Analytics Dashboard) via upsertUserData function and also delete entries via deleteUserData function.
It's an object available in the pluginApi that wraps those 3 functions:
pluginApi.learningAnalyticsDashboard.upsertUserDatapluginApi.learningAnalyticsDashboard.deleteUserDatapluginApi.learningAnalyticsDashboard.clearAllUsersData
For the upsert function, the argument's data object structure must be:
interface LearningAnalyticsDashboardUserData {
  cardTitle: string;
  columnTitle: string;
  value: string;
}
For the deleteUserData function, the argument's data object structure must be:
interface LearningAnalyticsDashboardDeleteUserData {
  cardTitle: string;
  columnTitle: string;
}
For the clearAllUsersData function, the argument is the cardTitle (optionally), and when it's not sent, all the entries for a specific plugin will be deleted. (And if the card ends up empty, it will be removed)
If the user is a moderator, there is the possibility to publish data on behalf of other users by using the second optional parameter named targetUserId
So that the data will appear in the following form:
| User | Count | <columnTitle> |
|---|---|---|
| user-name | 1 | <value> |
See example of use ahead:
const targetUserId = 'abcd-efg';
pluginApi.learningAnalyticsDashboard.upsertUserData(
  {
    cardTitle: 'Example Title',
    columnTitle: 'link sent by user',
    value: '[link](https://my-website.com/abc.png)'
  },
  targetUserId,
);

pluginApi.learningAnalyticsDashboard.deleteUserData(
  {
    cardTitle: 'Example Title',
    columnTitle: 'link sent by user',
  },
  targetUserId,
);

pluginApi.learningAnalyticsDashboard.clearAllUsersData(columnTitle);

pluginApi.learningAnalyticsDashboard.clearAllUsersData(); // Or without the Column Title
Note 1: the value field (in the upsert function's argument) supports markdown, so feel free to use it as you wish.
Note 2: pluginApi.sendGenericDataForLearningAnalyticsDashboard is now being deprecated, but has the same data structure as upsert (without the possibility to send entry on behalf of another user)
External data resources
This is the new integration with external servers to fetch data in a secure manner.
This is possible by simply configuring the dataResource name in the manifest and then its endpoint in the URL meta parameter that goes in the create request. The manifest would look like:
{
  // ...rest of manifest configuration
  "remoteDataSources": [
    {
      "name": "allUsers",
      "url": "${meta_pluginSettingsUserInformation}",
      "fetchMode": "onMeetingCreate", // Possible values: "onMeetingCreate", "onDemand"
      "permissions": ["moderator", "viewer"] // Possible values: "moderator", "viewer", "presenter"
    }
  ]
}
Going through each parameter to better understand it's structure:
name: It is the name of the remote data source, that is the name you'll use later on in the plugin when developing it;url: The Url to which the data will be fetched (it can be hard-coded in themanifest.json, but we recommend passing it as ameta_parameter);fetchMode: It tells the plugin-server if it should fetch the data only when creating the meeting, or every time the function is called in the plugin portion;- If one chooses
onMeetingCreate, the data will be fetched when the create endpoint of the meeting is called, then it's cached in the plugin-server so that every time the plugin wants that data, the plugin-server will respond with the cached data; - On the other hand, if
onDemandis selected, every time the plugin calls this method, the plugin-server will fetch the data and then proxy it to the plugin;
- If one chooses
permissions: This tells the back-end which role of the meeting can access this remote data;
Here is the /create parameters you would have to pass to make this remote-data-source api work:
meta_pluginSettingsUserInformation=https://<your-external-source-with-your-authentication>/api/users
pluginManifests=[{"url": "http://<domain-of-your-manifest>/your-plugin/manifest.json"}]
See that we send the meta_ parameter, for more information, refer to the meta parameters section
Lastly, in the plugin, just use the function like:
pluginApi.getRemoteData('allUsers').then((response: Response) => {
  if (response.ok) {
    response.json().then((r: CourseData) => {
      // Do something with the jsonified data (if it's a json)
    }).catch((reason) => {
      pluginLogger.error('Error while processing the json from success response: ', reason);
    });
  }
}).catch((reason) => {
  pluginLogger.error('Error while fetching external resource: ', reason);
});
Customize manifest.json
The following sections explain how you can dynamically customize your manifest.json for different runs.
Meta_ parameters
This is not part of the API, but it's a way of passing information to the manifest. Any value can be passed like this, one just needs to put something like ${meta_nameOfParameter} in a specific config of the manifest, and in the /create call, set this meta-parameter to whatever is preferred, like meta_nameOfParameter="Sample message"
This feature is mainly used for security purposes, see external data section. But can be used for customization reasons as well.
Plugin_ parameters
plugin_ parameters work similarly to meta_ parameters, allowing data to be passed dynamically to the manifest. While they can serve the same purposes — like security or customization — they are specifically scoped to individual plugins.
Format:
plugin_<pluginName>_<parameter-name>
<pluginName>— The name of the plugin as defined inmanifest.json.<parameter-name>— The parameter's name. It may include letters (uppercase or lowercase), numbers and hyphens (-).
This naming convention ensures that each plugin has its own namespace for parameters. Other plugins cannot access values outside their own namespace. For example:
plugin_pickRandomUserPlugin_url-to-fetch-data=https://...
This isolates the parameter to pickRandomUserPlugin and avoids conflicts with other plugins.
Default value (fallback) for missing placeholder's parameters
If a plugin expects a placeholder (via meta_ or plugin_) but doesn't receive a value, the plugin will fail to load. To prevent this, both types of placeholders support default values. This allows the system administrator to define fallback values, ensuring the plugin loads correctly.
Example with a default value (manifest.json):
{
  "requiredSdkVersion": "~0.0.77",
  "name": "MyPlugin",
  "javascriptEntrypointUrl": "MyPlugin.js",
  "localesBaseUrl": "https://cdn.domain.com/my-plugin/", // Optional
  "dataChannels":[
    {
      "name": "${plugin_MyPlugin_data-channel-name:storeState}",
      "pushPermission": ["moderator","presenter"], // "moderator","presenter", "all"
      "replaceOrDeletePermission": ["moderator", "creator"] // "moderator", "presenter","all", "creator"
    }
  ]
}
In this example, if the parameter plugin_MyPlugin_data-channel-name is not provided during the /create call, it will fall back to "storeState".
Event persistence
This feature will allow the developer to save an information (which is basically an event) in the event.xml file of the meeting if it's being recorded.
To use it, one first need to add the following lines to their manifest.json:
{
  // ...rest of manifest configuration
  "eventPersistence": {
      "isEnabled": true
  }
}
Then, the API in the SDK for that is:
pluginApi.persistEvent(eventName: string, payloadJson: Object);
See example in the sample-use-meeting plugin here in this repository. It is as follows:
useEffect(() => {
    setInterval(() => {
      pluginLogger.info('persisting event');
      pluginApi.persistEvent('eventFromUseMeetingSample', { foo: 'bar' });
    }, 5000);
  }, []);
After the meeting is ended (considering it has been recorded), one can simply do the following steps to see the events:
In the server terminal run:
sudo updatedb
vi $(locate events.xml | grep <meeting-id>)
Where <meeting-id> is the id of the the meeting you just recorded. Then, amongst all the other events in the file, if you search it, you will find the following:
<event timestamp="25004947" module="PLUGIN" eventname="PluginGeneratedEvent">
  <payloadJson>{"foo":"bar"}</payloadJson>
  <pluginEventName>eventFromUseMeetingSample</pluginEventName>
  <date>2024-10-30T18:00:11.929Z</date>
  <pluginName>SampleUseMeeting</pluginName>
  <userId>w_sxlfjbcb0yxs</userId>
  <timestampUTC>1730311211929</timestampUTC>
</event>
Guidelines
This section outlines good practices for developing plugins. These are mandatory for official plugins developed by the BBB organization and its partners, in order to maintain reliability, security, and accountability.
Dom element manipulation guidelines
Since plugins are loaded directly into the client, there is no technical restriction preventing developers from manipulating DOM elements arbitrarily. However, we strongly recommend following these practices:
- Whenever possible, manipulate elements using the hooks provided by dom-element-manipulation;
- If the functionality you need is not available, create an issue in the SDK repository or check if one of the extensible areas can meet your needs;
- Never edit chat message contents directly (even with DOM manipulation). Currently, the playback from the recordings portion of BBB does not support plugins or extensions. Any changes made to live chat messages (such as adding or removing words) will not be reflected in the recording, leading to inconsistencies and potential accountability issues.
To emphasize: Do not alter the text content of chat messages. Doing so can cause severe reliability and accountability problems.
Instead, the hook provided can be used to modify how messages are presented — for example, by changing the style to emphasize certain word(s), rendering a special layout for "notification" type messages (similar to the "change presenter" message), or even displaying both the original message text and additional custom-rendered UI elements.
Localization
The Plugin SDK provides the useLocaleMessages hook, described in the auxiliary functions section. While its use is not mandatory, we highly recommend it because it handles certain edge cases that are otherwise difficult to predict.
We also strongly encourage developers to include localization in their plugins. This greatly improves adoption and usability within the community.
For a practical example, see how the pick-random-user plugin uses it in the useGetInternationalization hook.
Frequently Asked Questions (FAQ)
How do I remove a certain extensible area that I don't want anymore? It is pretty simple: just set an empty array of elements of that specific extensible area. Or simply remove the specific item of the array and set the new array to that extensible area in the next iteration.
See example below:
// First iteration:
  // Define both variables:
  const dropdownToUserListItem = { ... };
  const buttonToUserListItem = { ... };
  pluginApi.setActionsBarItems([dropdownToUserListItem, buttonToUserListItem]);

// Second iteration:
  // Redefine variable(s):
  const newButtonToUserListItem = { ... };
  pluginApi.setActionsBarItems([newButtonToUserListItem]);

// Third iteration:
  // I don't want any of this extensible-area:
  pluginApi.setActionsBarItems([]);
  // All set from this plugin will disappear from the UI;
How to properly build a plugin? Just go to your plugin folder, install dependencies and run the build command as follows:
cd my-plugin-folder/
npm i
npm run build-bundle
At this point, another folder will be created into the plugin directory called "dist/" inside of that folder you will find the plugin itself MyPlugin.js. Remember that the name of this file will be the same as defined in the webpack.config.js, such as:
module.exports = {
  // ... Other configurations
  output: {
    filename: 'MyPlugin.js'
  }
  // ... Other configurations
}
Does the builded plugin need to be in the same BBB server?
No, feel free to host it anywhere you want, just make sure to point the URL from manifest.json correctly (into the create endpoint or bigbluebutton.properties).
I am making my plugin based on a sample inside the SDK, but somehow, the sample is not working properly, what do I do to run it in dev mode and make it work? Well there are several motives to why the sample is not working properly, so I will go through each one of them briefly:
- The config has not been set properly in
manifest.json, see this section to configure your plugin; - The plugin is not even running in dev mode, it could be the port already in use, or typescript and/or javascript errors (Make sure to initialize the
pluginApias any of the samples inside a react function component); - It could be an error with that sample indeed, or that feature the plugin uses broke (it is not usual, but can happen since BBB is constantly changing and enhancing its features with its wonderful community). If that happens, just open an issue in the SDK's github detailing the error you are facing. And thank you in advance for reporting it back to us so we can improve each time.
How to troubleshoot the plugins? See if it has loaded in the BBB, for instance. Well, each time a set of plugins listed to be run into a specific meeting start, it will fire some logs based on the amount of plugins that it need to load inside the client. So open the console in the browser by pressing F12 key in your keyboard and search for the following log:
<ratio of loaded plugins> plugins loaded
If 1 out of 5 plugins loaded, you'll see "1/5 plugins loaded", and so on.
Also, when a plugin loaded, the client will log it's name like:
Loaded plugin MyPlugin
Sometimes, there could be the case of a plugin to not load properly and an error will log with the following message:
Error when loading plugin MyPlugin, error: {"isTrusted":true}
In this case, the URL that leads to the plugin is not available or leads to an error. But it can log something different, so pay attention to what the error message will tell you.
Lastly, there are, of course, other scenarios and different informative logs, but these are the most common and important ones. Please contact us if you feel we left something out!